i hope everyone had a fantastic thanksgiving holiday.
yesterday, i spent 12 hours of my day working... but i can say that i am thankful to have my job. it is so hard being away from your family on such a great day. for the past three years, david and i have hosted our own thanksgiving dinner. last year we were able to enjoy the meal with some close friends, but this year it will just be us. so tomorrow we will spend the morning and afternoon preparing a thanksgiving for two.... i must say, im excited! a romantic thanksgiving - who would've thought it?!?!
on the menu -
turkey breast
stuffing
crock pot mac n cheese
broccoli casserole
dinner rolls
a fantastic dessert
writing out all these dishes is making me feel starved already - but this entire week (including the actual thanksgiving day) we have been dieting. yes, who diets on thanksgiving day??? apparently us! we have started a low glycemic diet, like the four hour body/paleo diet. the first two days consisted of major cravings for sweets and starches and a constant headache. all that has gone away now and the amount of weight loss is incredible. you have one 'binge' day a week, and that will be our 'thanksgiving' dinner tomorrow... i am counting the hours until we begin preparing!
now it's time to concentrate on christmas... can't believe it's already time to put up the tree and decor! (even though i've been listening to she & him's new christmas album since the release date!!!) i actually had a shopping partner this black friday... my hubby!!! that's right. we left at midnight last night and shopped throughout the night. and i am VERY proud to say that already we have nearly 90 percent of our christmas shopping complete! yay!
really hope everyone had a great holiday.
i am so thankful for all the joys of my life!
Friday, November 25, 2011
Monday, November 21, 2011
{DIY refinished dresser and a salvaged window turned mirror}
long ago, i thrifted this old and beat up antique dresser -

it was dirt cheap and i fell instantly in love.
i sanded it down to the original wood and painted it a grayish-blue color.
i added glass knobs and called it a day.

this pretty little dresser has been the focal point of our guest bedroom for nearly two years now, but recently i just wasn't feeling the look. i felt it needed something more than just a painted finish.
enter miss mustard seed.
i want every single piece of furniture this girl finishes.
really, she is amazing.
so again, i was determined to refinish this refinished antique.
i detached the mirror and decided not to use it again.
i sanded all the polyurethane off, then hit it with the sander all over the edges and in all the nooks to expose the original wood. i also roughed up some random spots along the top and on the drawers.
here is what the edging and one of the drawers looked like after sanding -


and for the magic -
i used dark walnut stain (my go to color) and literally wiped it on, then wiped it off. all of those sanded areas were darkened, and the grayish blue painted areas were given a glazed aged look.
(exactly what i was going for!!!)
i was instantly satisfied and ABSOLUTELY knew that this dresser would never be touched again!
here is what the drawer looked like after the stain -


i coated my new dresser with minwax paste to give her a nice smooth finish.

this stuff rocks. i use it on every piece i refinish!
now that part was complete and i just needed to find myself a mirror.
i have had a project up my sleeve for quite sometime now about making my own mirror from an old window and this crazy genius invention of looking glass spray paint.
well low and behold, i scored by finding a seriously old and worn window!!!!


lots of chippy paint (probably lead) to remove on both sides...

i took my hand sander to the frame of the window, removing all the paint and dirt and junk that had built up over the years on this ancient window.
then it looked like this -


finally after removing all that grim, i used my sweeper attachment to clean all the dust off.
now we have this!

gave it a quick spray down with the water hose.
notice the glass pane falling out on the bottom... once everything is completely dry add clear caulking or super glue around your frame to hold the glass in.

what made this project complete was krylon looking glass spray paint. this little bottle was not easy to find. i searched at three different stores, and finally (luckily) scored a bottle. it's not your normal spray paint. it comes in a small container and is 12.99!
it was well worth the money.

spread out your drop cloth outdoors and place your window over that with the back of the frame facing up. you want to spray the back side because this paint gives a mirrored effect on the reverse side.
start spraying even coats over the glass.
you can re-coat quickly because the paint dries so fast. i believe i gave the glass five different coats.

this is what the window looked like after spraying. cloudy. i was worried for a bit.
but then i flipped her over....
and we had a mirror!

how it all fit perfectly together -


i love the contrast of the colored dresser and the rustic wood mirror!


i think the new color makes the glass knobs stand out more, and i love that

and accessorizing this table could not be complete without a few blue mason jars. just adds that extra loveliness.

i love my new dresser and mirror and feel REALLLLLLLLLY proud of this one!
Tuesday, November 8, 2011
because i love them so much...
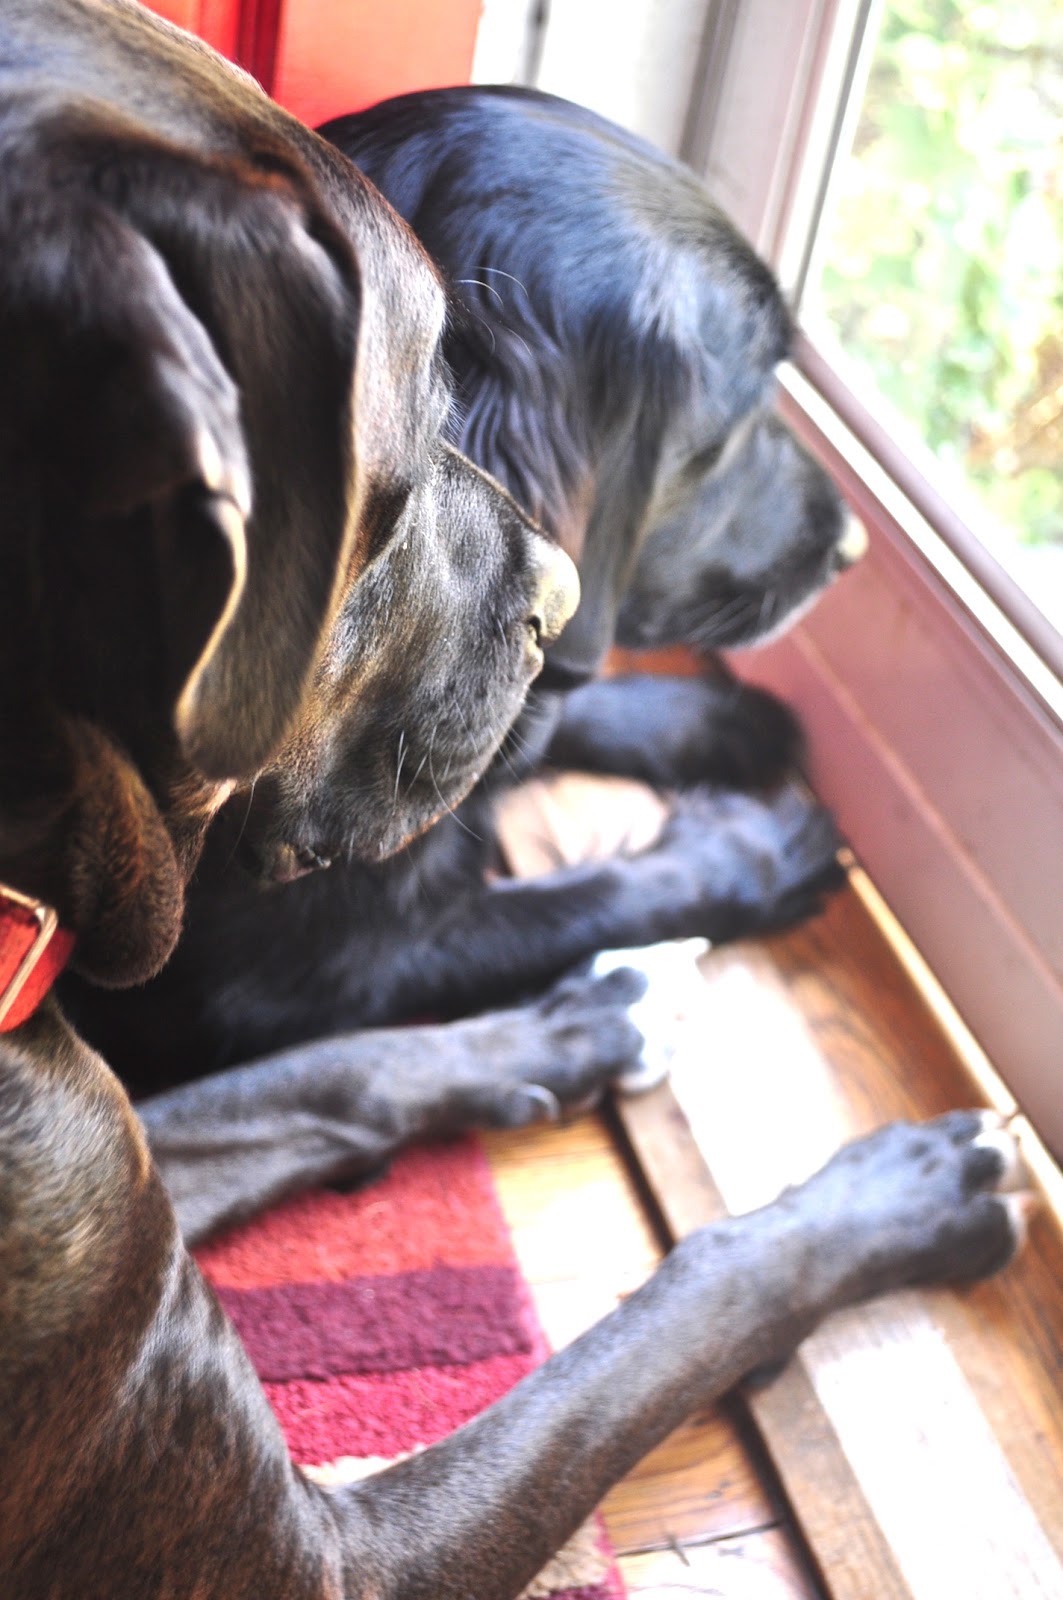
laying at the front door watching the world outside is where they love to be the most. i happened to catch this moment a few days ago, and LOVE how it turned out.


my sweet ollie and emme.
we are leaving for california tomorrow morning... have to be at the airport at 4:30 am... phew.
needless to say, our babies are being dropped off tonight at the kennel. i'm so grateful that we have a place so wonderful to keep our loving pups. play dates every day with all the other pups staying there... being spoiled by new faces...tasty new treats that they don't get at home...
oh the life of a pup!
they are way more excited to go than we are to take them...
hope everyone has a wonderful week! we will be enjoying the warm(er) california weather and sharing in the celebration of marriage!
mark and anita are a perfect couple! and a los angeles wedding on 11.11.11 - well, that is just fabulous!
Saturday, November 5, 2011
{DIY Sofa Table turned Upholstered Bench}
here is the part where i would insert a before photo of the sofa table being used.
i am just too embarrassed to show this hunk of junk that has been sitting behind my sofa for three years.
this piece of furniture was claimed by my boy, Oliver, when he was just a tiny pup. good thing he was the cutest thing i had ever seen in my life because this pup chewed EVERYTHING he could wrap his mouth around... including this sofa table.
we have been talking for months (years) of just sitting it outside for trash pickup. i mean, it is trash. but then i had a pinterest breakthrough - sofa table turned upholstered bench.
yes! yes! yes!
folks, here is the only before i am willing to share -
 see that white muddy looking spot on the leg that my hubs is cutting off... that was a giant pup chew hole filled over with wood putty. lovely, right?!?!
so all the legs were wacked off.
 see more teeth marks on this leg-
 and even on the top corner of the table. how on earth did he reach that??? well he did weight in at 50 pounds at a mere five months of age...
 now is when i tell you a bit about my precious oliver. he is seriously the most adorable, loving, and sensitive pup. yes, he was quite the nightmare in the early stages because of teething. we would literally leave the room for two minutes and he would destroy something. thankfully, all of that is over. he is now a couch potato and stays in the same spot alllllll day long until we come home from work. he and emmylou have a toy basket and they both go to that for their toys when they want play time. no chewing or destruction anymore... and thank god for that! see my beautiful boy... just precious.
 so back to the table - it was just bad.
next we sanded. we hit it good where the legs were cut off so it would have a smooth finish, then lightly over the painted areas.

 i painted the table white, let that dry and then gave her a second coat.
 i didn't bother painting the top lip of the table because that would all be covered in fabric.
and speaking of fabric, i needed some! i went in search of something blue/green/beige to match my decor and i found a major score at joann's with this beautiful upholstery fabric! if you are upholstering something, spend the money on the good fabric. it really does hold up longer and just looks better.
 i also purchased one inch thick foam and some batting, a button cover kit, a super long upholstery needle and some thick thread. i was set!
i covered my buttons using the kit i purchased (which was simple to do).
 pretty much in photos- here is how that process goes. you have a mold, the top of the button, the back of the button, and a pusher. cut your circle and lay it on top of the mold, add the top and push it through.
 tuck all the fabric to the center of the button
 add the back to your button
 and pull it out. you have a covered button. simple.
 i then measured the width of my table top and took half that number and made a mark. i drew a line down that center mark showing me where i would place my buttons. i marked my four spots to show where the buttons would go and used a long drill bit to drill the holes.
i'm getting pretty darn good with this power drill =)

 next i put my foam on the tabletop and cut the excess off with a serrated knife. and no... i didn't just use my hubbys wusthof serrated knife to cut foam?!?!? ;-)
 i laid my batting out on the floor, put the cut foam down and flipped my bench over right on top of the foam. make sure everything is lined up correctly and pulled tight! i used small finishing tacks and hammered those in place every few inches to secure my batting.

 once i had went all the way around with the tacks i flipped the bench back over and was ready to add my fabric!
already looking like a bench, don't ya think?!?!

 i LOVE that this sofa table had a drawer. STORAGE!!! i'm renaming this to a sofa table turned upholstered STORAGE bench!
another score - i found these beauties nestled away in my closet. i purchased them at an anthropologie sale, and even though there was only two, i knew that one day they would come in handy. boy was i correct!
 now- the hard part.
ENTER LIFESAVING TIP
SERIOUSLY, LIFESAVING.
if you only own a manual staple gun (like me) put down the fabric and drive to your local hardware store. buy an electric staple gun. i promise, it will be worth every penny spent. otherwise, your hands will be numb for hours (like mine) and this part will take you like quadruple the time because you just cant keep stapling with a manual gun. your hands will tire and just won't be able to go against the force of pulling that dang trigger.
IRON YOUR FABRIC before upholstering your bench! we definitely don't want an upholstered bench with a crease going down the middle!
i pulled my fabric tight and stapled all the way around the table, but leaving the corners for last. when i did staple the corners, i just pleated the fabric to the corner of the table top, then stapled it in place.

 trim your fabric as you go cutting as close as you can to where you stapled. once everything was secure and stapled, i flipped the bench over and put another round of staples around the entire thing.
(seriously, have you ever used a staple gun? it's reallllllllly hard.)
i bet i used 300 staples.
 FINISHED!!!!!! all that is left is adding your buttons and this part is completely optional. it does make an adorable finished looked, in my opinion. i love tufting with covered buttons. perfect for benches, ottomans, and upholstered headboards.
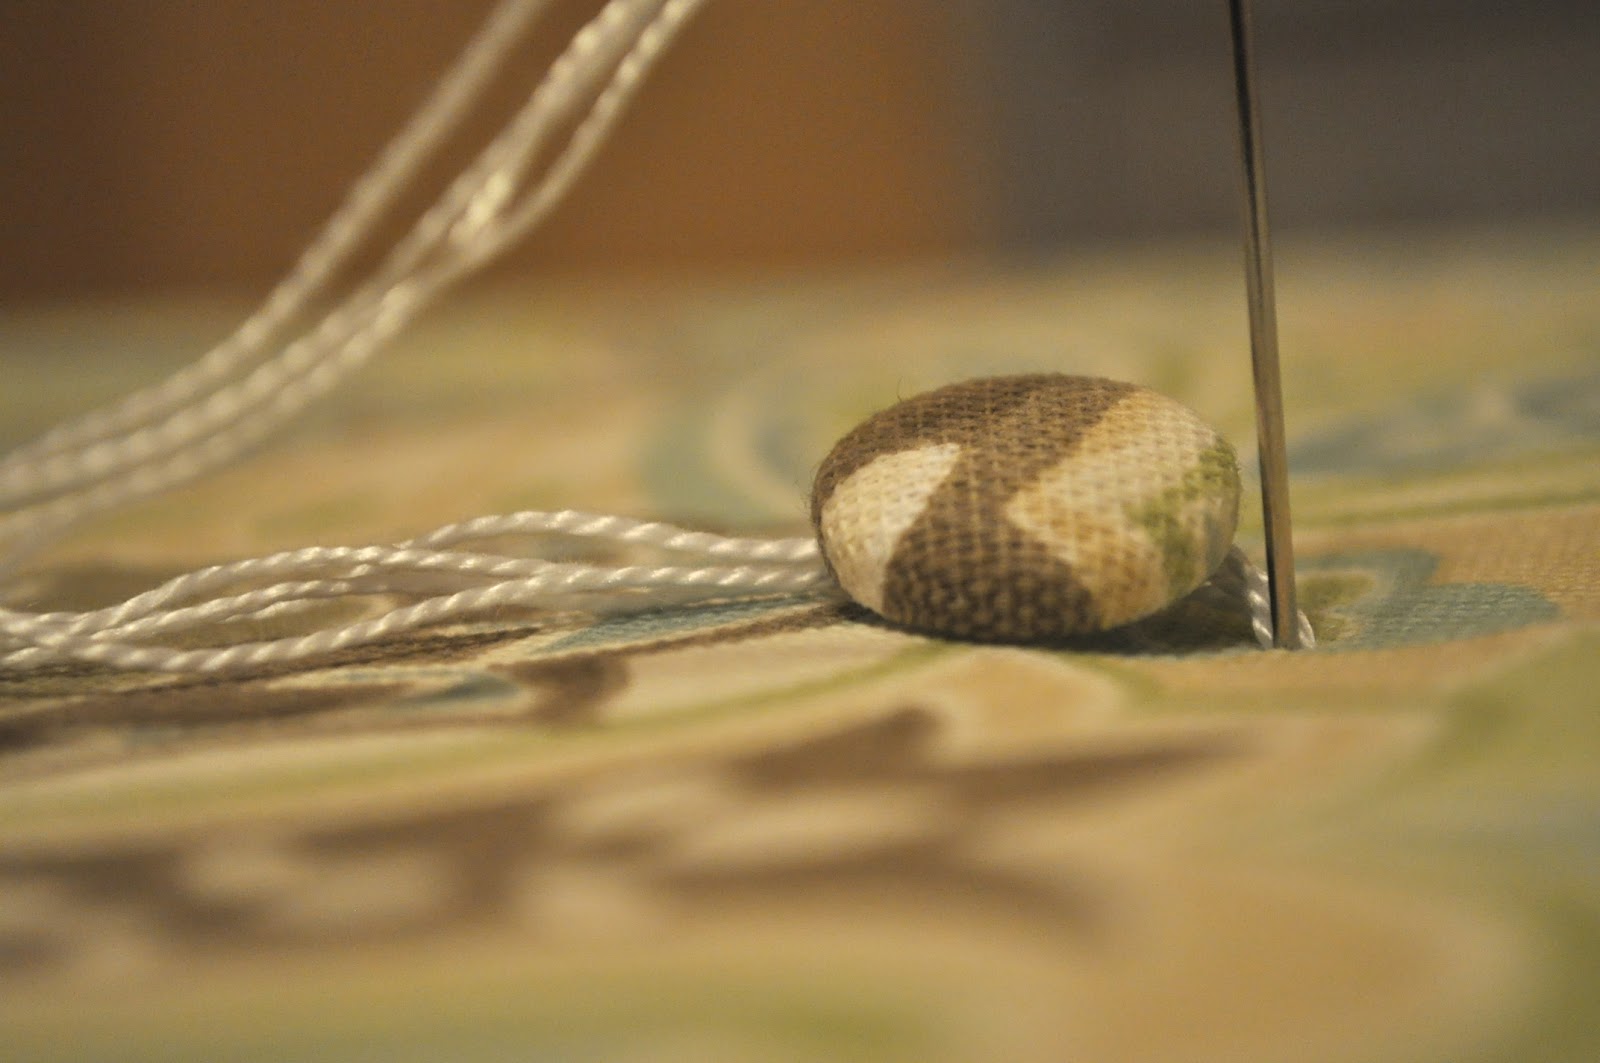
remember that 'mega' needle i purchased -
 double up your thread and bring your needle up through the bottom hole.
 i stitched through the loop twice for extra support.
 then insert your needle back through the same hole. this can be tricky, but just keep at it and eventually you will find it.
 pull your string tight to create the 'tufted' look.
 and staple your remaining thread a bazillion times to secure it.
 and there you have it. you have a lovely upholstered and tufted bench!!!


 i'm in love with how it turned out! and to think that we almost trashed this old junky sofa table.. just goes to show you how someones trash can truly be anothers treasure.
here is my cost breakdown for the new bench-
fabric - purchased two yards and used a 40% coupon = approx. 20.00
foam - purchased 60 inches and also on sale for half of = 12.00
batting - 6.00
ginormous needle - 5.00
thread - 1.00
finishing tacks - 2.00
staple gun and staples - free (already had them)
table - free
knobs - free
grand total for a brand new piece of beautiful furniture - 46 BUCKS!!!!
can't beat that.
i am just too embarrassed to show this hunk of junk that has been sitting behind my sofa for three years.
this piece of furniture was claimed by my boy, Oliver, when he was just a tiny pup. good thing he was the cutest thing i had ever seen in my life because this pup chewed EVERYTHING he could wrap his mouth around... including this sofa table.
we have been talking for months (years) of just sitting it outside for trash pickup. i mean, it is trash. but then i had a pinterest breakthrough - sofa table turned upholstered bench.
yes! yes! yes!
folks, here is the only before i am willing to share -

so all the legs were wacked off.


next we sanded. we hit it good where the legs were cut off so it would have a smooth finish, then lightly over the painted areas.


and speaking of fabric, i needed some! i went in search of something blue/green/beige to match my decor and i found a major score at joann's with this beautiful upholstery fabric! if you are upholstering something, spend the money on the good fabric. it really does hold up longer and just looks better.

i covered my buttons using the kit i purchased (which was simple to do).


i'm getting pretty darn good with this power drill =)


already looking like a bench, don't ya think?!?!


another score - i found these beauties nestled away in my closet. i purchased them at an anthropologie sale, and even though there was only two, i knew that one day they would come in handy. boy was i correct!

ENTER LIFESAVING TIP
SERIOUSLY, LIFESAVING.
if you only own a manual staple gun (like me) put down the fabric and drive to your local hardware store. buy an electric staple gun. i promise, it will be worth every penny spent. otherwise, your hands will be numb for hours (like mine) and this part will take you like quadruple the time because you just cant keep stapling with a manual gun. your hands will tire and just won't be able to go against the force of pulling that dang trigger.
IRON YOUR FABRIC before upholstering your bench! we definitely don't want an upholstered bench with a crease going down the middle!
i pulled my fabric tight and stapled all the way around the table, but leaving the corners for last. when i did staple the corners, i just pleated the fabric to the corner of the table top, then stapled it in place.


(seriously, have you ever used a staple gun? it's reallllllllly hard.)
i bet i used 300 staples.

remember that 'mega' needle i purchased -


here is my cost breakdown for the new bench-
fabric - purchased two yards and used a 40% coupon = approx. 20.00
foam - purchased 60 inches and also on sale for half of = 12.00
batting - 6.00
ginormous needle - 5.00
thread - 1.00
finishing tacks - 2.00
staple gun and staples - free (already had them)
table - free
knobs - free
grand total for a brand new piece of beautiful furniture - 46 BUCKS!!!!
can't beat that.
Subscribe to:
Posts (Atom)


