Wednesday, September 28, 2011

pottery barn console table... part two

so our inspiration table is built and sitting in the middle of our living room floor. it is already SO beautiful, but the best is yet to come.
the table has a bottom planked shelf and that is all we had left to assemble.
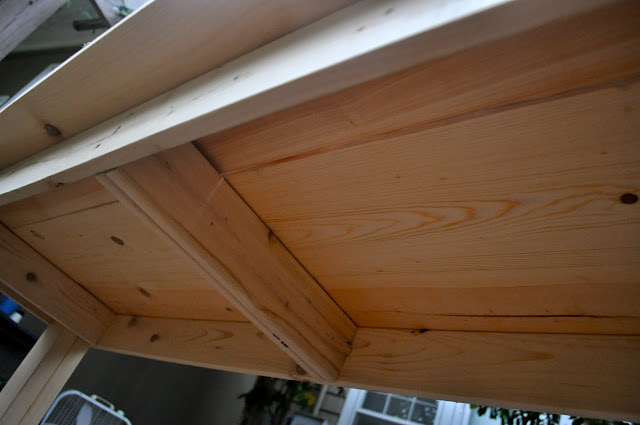
we had to frame the bottom inside so the boards would have something to sit on, and something to be anchored into. here is what that process looked like -
we used 8 foot long 1x4 boards and cut, cut, cut. i believe we had 15 pieces. then two small boards to fit in the ends of the table. the cutting took forever because if you cut literally a fraction too short or too long - the board is unusable. not good. so we cut one at a time, brought it inside and positioned it on the bottom.
and finally when all those boards were cut, we drilled the ends to the support.
once your holes are filled and dried, plan on spending lots and lots of time sanding. it will all be worth it in the end.
and here is our table... seriously sanded, no open screw holes, and ready for some color!
please excuse the living room mess... been a work zone in here, remember! 

Monday, September 26, 2011

pottery barn console table... part one

that is correct... a pottery barn 'inspired' console table has made its way into our lives. 
we saw this table...
 and we were inspired!
we have been planning on some building projects, and agreed that we should tackle something a bit smaller than what we were going for. 
so we decided to start with this!
we grabbed the notebooks and the tape measure and started to make a plan. that looked a little something like this: 
and after a trip to lowes, our back patio and yard looked like this:
things that we HAD to have to make this table:
patience (number one, hands down)
lots of screws
lots of wood
circular saw
drill
square
tape measure
wood glue
sander (we have a palm and a belt sander, and we used them both.)

first we cut our wood that would be used for the table top and positioned those to get a good dimension of the width of the table. then we put that to the side. 
we started with cutting the legs and then really just went from there. we used two 2x4's for each table leg, glued them and screwed them together. 
and trust me... ALWAYS countersink your screw holes. if you don't, chances are your wood will split. or you will have big screws sticking out all over your POTTERY BARN inspired table... not cool.
then we built the frame -
if we didn't have a square... this would have never been properly lined. who knew... a 5 dollar tool would save the life of your building project!
then start drilling your top boards in place.
and there you have your frame. we added some extra support on the inside of the top because we wanted overhang on each side and the ends.
so we added inner boards to the inside of the legs like this -
then take your boards for the table top you previously laid out, and assemble them on the top. countersink your holes and drill it in place!
here is a photo view of the center support beam we added to the top frame.
and here is our table - all put together and ready to be attacked with wood filler and medium grit sandpaper!!!! i can't believe we actually built this!

for those of you who love projects and have a few tools that are begging for a job... check out ana-white.com. this is a chick with power tools, and she builds ahhhhh-mazing furniture. she writes all her plans out in simple form, telling you what wood to buy and how to cut it.
and honestly, if we can do this for a first building project, anyone can do it... including YOU! 
as for our ultimate building plan - 
we bought a kitchen table when we first got our house in west virginia. its an adorable little table with two glass insets in the top. never, never, never again will i have a kitchen table with any glass on it. never again will i buy any type of table with glass on it. it is a collector of any particle imaginable. we just can't keep it clean. impossible. so for months we have been talking about wanting a new table. we have parsons chairs so really only need the table itself. and we are not buying until we find what we really want... so what do we really want - restoration hardware's reclaimed farm table. and how much does that one set ya back... 2200.00. yes folks, that is two thousand two hundred dollars. ugh.
so that is where ana-white.com comes in handy. this girl seriously drew up the plan for the EXACT table, built it, and sent her inspiration to blogland. 
and that is our ultimate building project.
i. can't. freaking. wait.
~
hope this has inspired someone out there in blogland. 
part two of the table process to follow...
happy building!
Saturday, September 24, 2011

scrap wood turned treasure...

i've got a thing with wood lately.
it's more like an obsession.
it's possibly because we have been knee deep in LOTS of wood projects. (will soon be sharing those.)

in my last post i referred to a Hafiz quote that i wanted to use for a subway art project.
unfortunately, it was a fail. i tried to mod podge a mirrored image on wood and let it dry for a few minutes, then rub off the paper with a damp rag leaving only the letters. you could see the quote, but the paper never really rubbed off completely. and i wasn't having that.
for my second option, i was going to just print out a poster and mod podge that... and that just wasn't cutting it either.
so i had lots of scrap wood from a building project (yes, i said building project!) and decided i would put those together and use stencils to paint my quote. the Hafiz quote was a little long, so i found another inspiration on pinterest, of course.
this was my inspiration -
this sign is from this website... and it's 300 bucks. yep.
and here is what i did to recreate. i took 5 scrap pieces of wood that were all 15 inches long and approx. 3 inches tall. i gave them a quick sand and then wiped them clean.
i applied one coat of minwax dark walnut stain then wiped the stain with an old cotton t-shirt.

and then the tedious part began... the stencils. i cut my letters out and positioned them on my board. i taped around ALLLLLL the edges to keep my lines clean. and this part took forever. i taped. then painted. then pulled the stencil up. remove all the tape. clean the stencils. do it all over again... F.O.R.E.V.E.R.
forever.
but...
it was all worth it.
after i had all my words painted on the boards i let them dry for about an hour. then i took them outside and gave the whole board another coat of stain. i used a foam brush and went over the letters a couple times to give them a weathered look.
i used my palm sander to go around the edges and corners, and also quick sanded the top of the boards. i used minwax finishing paste to seal all my hard work and was then ready to assemble my masterpiece.
to put all the boards together i used metal braces that i picked up at lowes for just a few dollars.
i love it so much... and the quote! if you are lucky enough, it is so true. i am happily hanging this in my home!!! maybe even over my headboard.


Thursday, September 15, 2011

(peach & blueberry cobbler)

i'm a girl with a strong love for fruit cobblers. they remind me of family and country settings and sweet summertime. all of the many things i hold so dear.
blackberry, cherry, blueberry, peach... you name it, they're all simply delish.

my favorite go to recipe has been one i have made many times this summer. not only is it simple to make, but it is SO savory and sweet. serve warm with vanilla bean ice cream and your belly will be thanking you.

recipe from oprah.com

Servings: Makes 8 servings
Ingredients
  • Ice cubes
  • 4 firm, ripe peaches  
  • 4 Tbsp. (1/2 stick) unsalted butter
  • 2 pints (5 to 6 cups) blueberries
  • 1 Tbsp. cornstarch
  • 1/2 tsp. cinnamon
  • 1 cup sugar
  • 1 cup all-purpose flour
  • 2 tsp. baking powder
  • Pinch freshly ground nutmeg
  • Pinch salt
  • 1 cup whole milk
Directions
Bring a pot of water to a boil. Fill a large bowl with ice and water; set aside. Score bottom of each peach with an X. Place in boiling water until skin begins to pull away, about 30 seconds. Transfer to cold water; let sit until cool, about 30 seconds.
Preheat oven to 350°. Pull skin off peaches starting at the X. Cut peaches in half, remove pits, and slice into 8 wedges each, placing in a large bowl as you go. Put butter in a 3-quart baking dish; transfer dish to oven until butter is melted and dish is hot, about 5 minutes. Add berries, cornstarch, cinnamon, and 1/4 cup sugar to peaches; toss to combine.
In a medium bowl, whisk together flour, remaining 3/4 cup sugar, baking powder, nutmeg, and salt; whisk in milk. Pour batter into dish. Top with fruit. Bake until golden brown, about 45 minutes. Serve hot with vanilla ice cream.
Monday, September 12, 2011

{distressing wood & mason jar wall art}

if you love mason jars as much as me, you will L.O.V.E this project.
a special thanks to the million pins on PINTEREST for this fabulous idea!!!

it was unbelievably beautiful outside on saturday and we wanted to spend as much time as possible outdoors. i have some upcoming projects that will require me to distress wood and play around with stains and colors - so what better day than today to practice.

i took a piece of wood that my hubby cut to size to make a mason jar wall sconce. i can't tell you how easy this was to make. (and how expensive they are to buy!)
i used turquoise paint, then added the stain, wiping off as i went. i purchased a 3 inch pipe clamp at home depot, positioned it on my wood and nailed a hole through the back, allowing my little mason jar to slip right in. i put a hanger on the back for easy hanging. 
simple.
all i need to do is to hang it up and fill it with fresh flowers!

after all this fun crafting with my hubby, i believe i am ready to tackle my BIG project. i can't wait to share the outcome!
Friday, September 9, 2011

{sunday's at home}

one thing i miss the most about living in west virginia is my family get togethers on sunday afternoons. seriously, we never miss a single week. the entire family comes to my parents house after church to eat dinner and just relax- and this is a few of the reasons i miss that.

 1. words with friends...with eachother =)
2. painting beautiful baby toenails.
3. braiding hair - even uncle david jumps in on the fun!
4. getting SO much love from my beautiful nieces and nephews.
5. devouring my mothers amazing cooking. 

love this pic of my lovely lala with uncle david-
and my silly boys, christian and ethan-
curly haired boys-
also going home allows me to spend time with my BEST friend in the world, crystal. 
i love this girl so much. so much.

i really miss home but being away makes me love it so much more.
 

Blog Template by BloggerCandy.com