after many hours of work (major work), i can finalllllllly show you all the finished table and bench - and i am beyond excited!
i will start with a list of all the tools and products we used to build everything -
miter saw
circular saw
belt sander
palm sander
dremel (used to sand notches and distress edges of wood)
hand planer
tape measure
square
pencil
chisel
hammer
kreg jig mini pocket hole kit
pocket screws
LOTS of sandpaper (100 and 220 grit)
minwax english chestnut stain
minwax gloss polyurethane
minwax satin poyurethane
and lots of wood
now i will tell you the most surprising part of this entire process - and why all of my reveal photos are taken with the table and bench still on my porch and not in my dining room....
all those hours of work put into building this - all the sweat and bug spray and physical exhaustion...
THIS TABLE IS NOT OURS TO KEEP!
we decided that we would build this as a wedding gift to very dear friends! they have done so very much for us and have been wanting a dining room table - so they are getting just that! we have been sending them photos along the process and they are SO excited to finally have this table in their home!
the bottom stretcher of the table has a very special message on the underside. using our dremel tool, we engraved their name and the year as a 'little something special' for them to always have.
we are currently in the process of building our own table, so when it is finished, i will share that one as well!
and the finished table and bench -
i'm telling ya - this tabletop is so smooth! and after 4 coats of poly, it better have been!
the handmade burlap fringed table runner looks amazing on the new table, and this was also part of the gift! (blog post on that soon!)
so there you have it! the restoration farmhouse table built for less than 200 bucks! we are more than excited to have made this and can't wait to have our own. needless to say, our friends were beyond excited and it looks amazing in their dining room!
Monday, June 25, 2012
Saturday, June 16, 2012
DIY farmhouse table - part two
{sorry that part two has taken me so long to post :( right now 95 percent of my time is being spent in west virginia with my family for certain reasons -but i will get the finished product up here as soon as possible. thanks for all the calls, texts and emails... means the world.}
here is where the hard part began... the top and finishing.
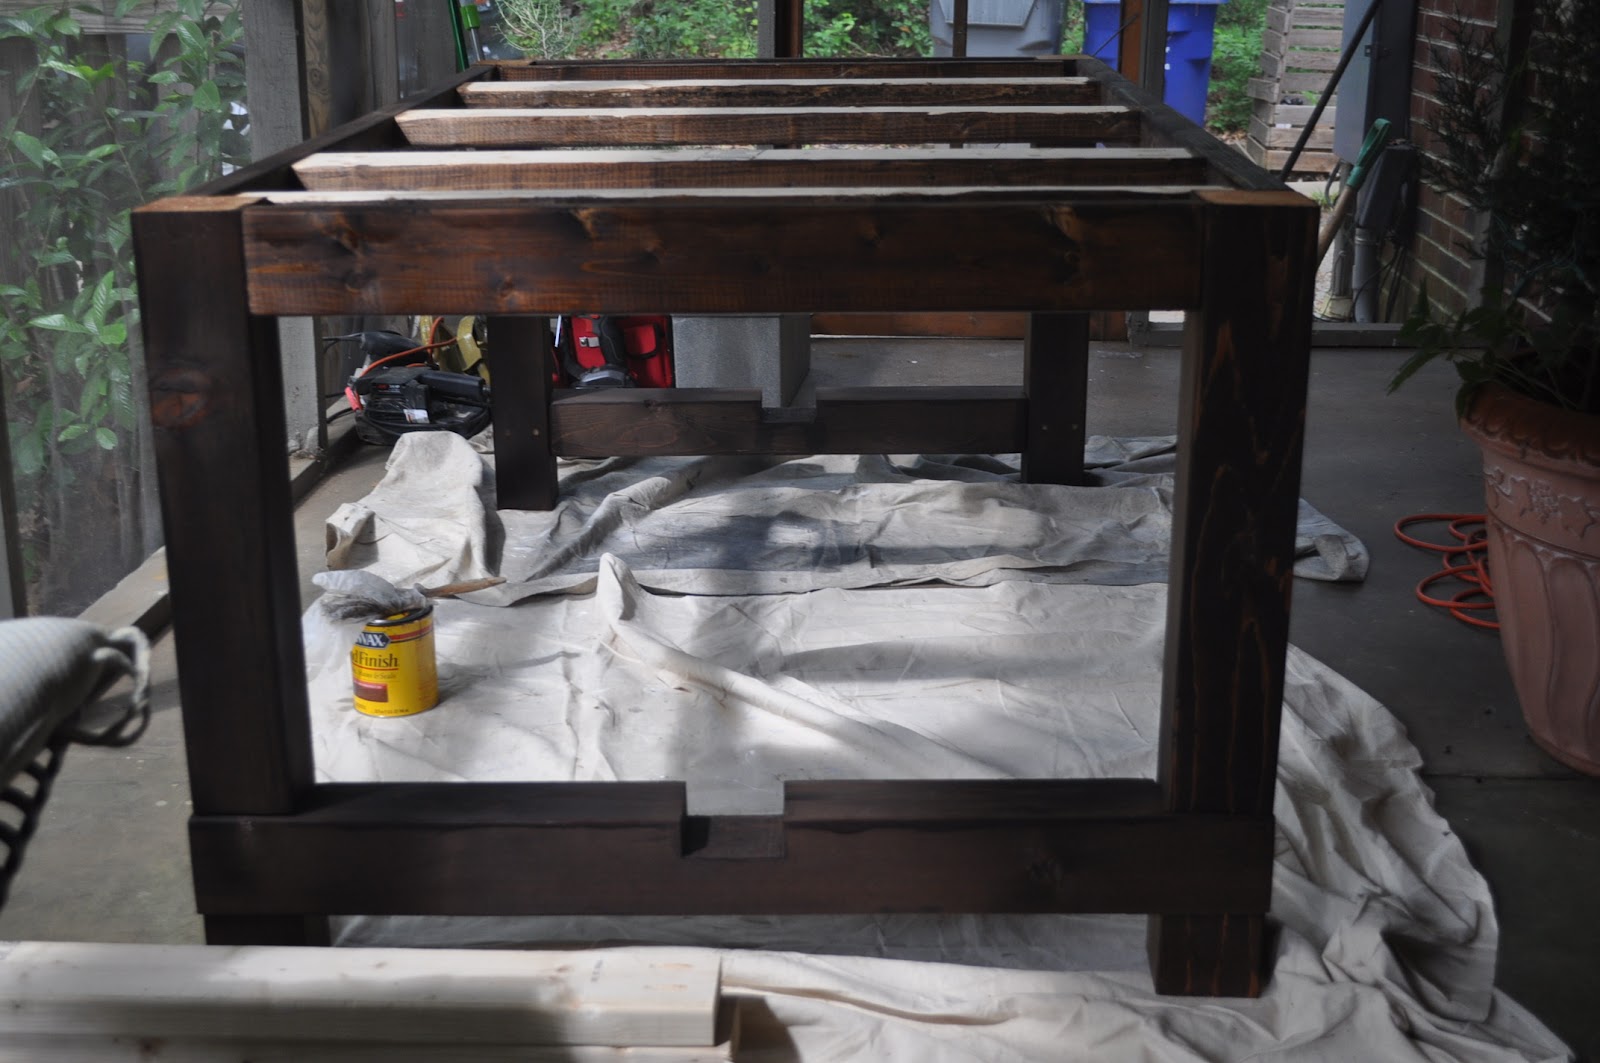
yes, cutting the wood to the exact measurements can be nerve racking, but staining the table is the final straw. we chose to use english chestnut by minwax and started with the base of the table.
then we put together the table top. we went with 2x10 and 2x12 planks, using two of each. we used the kreg jig to attach the boards together on the underside of the tabletop.
the table top wasn't perfectly even - and i wanted it to be smooth enough to slide a plate across! david went and bought a hand planer and used that to even out all the top boards. it did exactly the job we needed - and after completely wearing our arms out our table was perfectly smooth! we cut the breadboard ends and attached those to complete the tabletop.
table DONE! atleast the building part...
here is what we did with EVERY SINGLE BOARD to prepare the stain.
when the wood was cut to it's measurement we would sand with 100 grit sandpaper using a belt sander.
then i would sand again with my palm sander using 220 grit sandpaper. this gives a super smooth finish.
then you stain.
then you sand again with 220.
then you stain.
EVERY. SINGLE. BOARD. (and there are a lot of boards!)
we put the tabletop on saw horses to stain -
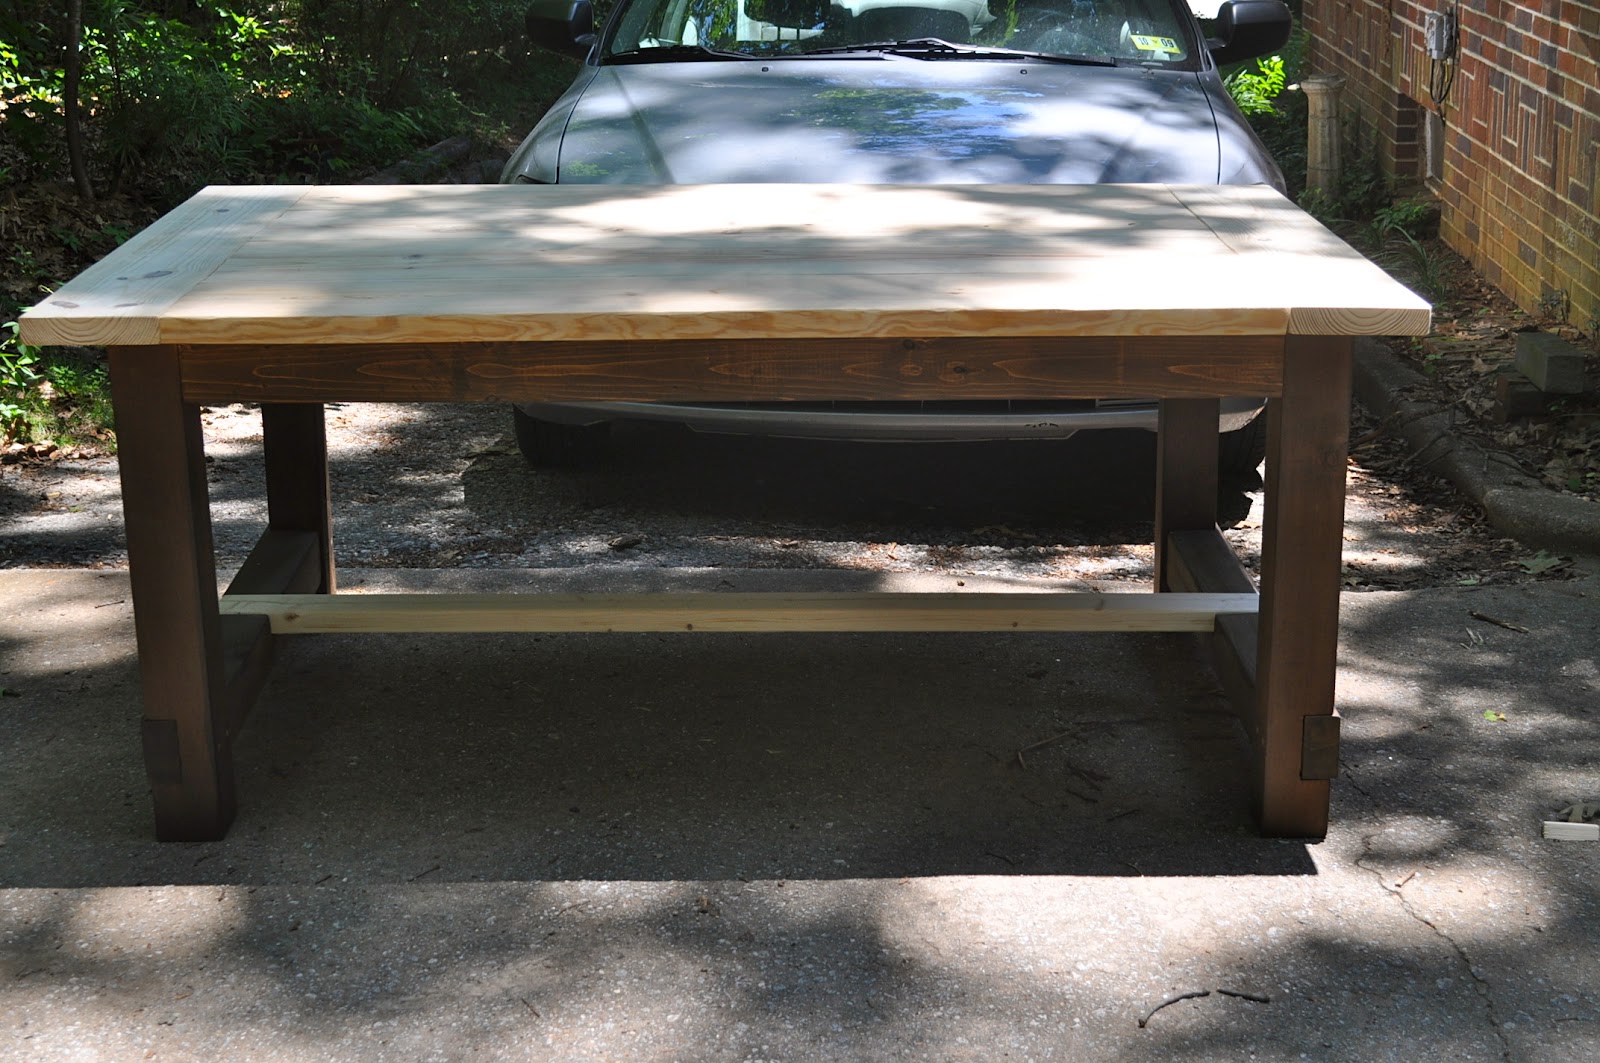
so the tabletop was sanded and stained and sanded and stained - and then it was finished! (even though we still have a boatload to do...)
and there she is sitting out in the sun to dry. the stain seriously soaked into the wood and ended up being much more on the mahogany side than we expected. we are doing two coats of gloss poly then finishing with two more coats of satin poly, so that will also make the color change a bit.
until next time :)
here is where the hard part began... the top and finishing.
yes, cutting the wood to the exact measurements can be nerve racking, but staining the table is the final straw. we chose to use english chestnut by minwax and started with the base of the table.
then we put together the table top. we went with 2x10 and 2x12 planks, using two of each. we used the kreg jig to attach the boards together on the underside of the tabletop.
the table top wasn't perfectly even - and i wanted it to be smooth enough to slide a plate across! david went and bought a hand planer and used that to even out all the top boards. it did exactly the job we needed - and after completely wearing our arms out our table was perfectly smooth! we cut the breadboard ends and attached those to complete the tabletop.
table DONE! atleast the building part...
here is what we did with EVERY SINGLE BOARD to prepare the stain.
when the wood was cut to it's measurement we would sand with 100 grit sandpaper using a belt sander.
then i would sand again with my palm sander using 220 grit sandpaper. this gives a super smooth finish.
then you stain.
then you sand again with 220.
then you stain.
EVERY. SINGLE. BOARD. (and there are a lot of boards!)
we put the tabletop on saw horses to stain -
and there she is sitting out in the sun to dry. the stain seriously soaked into the wood and ended up being much more on the mahogany side than we expected. we are doing two coats of gloss poly then finishing with two more coats of satin poly, so that will also make the color change a bit.
until next time :)
Labels:
DIY
Sunday, June 3, 2012
DIY farmhouse table - part one
i can't belive i am actually blogging this... a DIY FARMHOUSE TABLE!!!!
for mannnnny months i have been dying to get started on a farm table. we have bookmarked a billion blog postings showing the different steps of how people made their own, and finally it was time to make our own.
we went off these two plans to create our own version. all measurements had to be adjusted to create a six foot table.
tommy and ellie's farmhouse table
ana white farmhouse table
we did not want to use two 2x4's put together for the table legs so we chose to go with 4x4's like tommy and ellie. plus we wanted to make our table as close as possible to the original restoration hardware farmhouse table.
finding untreated 4x4's was quite the nightmare. we finally ended up choosing cedar which was muuuuuch more expensive than the regular untreated lumber, but this was going to be a long lasting piece of quality furniture, so well worth the extra money. after borrowing a friends truck and hauling all the lumber home, we started the building process!
first step - the notches.
this. took. FOREVER.
david cut the four legs and the side stretcher that connected them. there would be a total of ten notches. it was the most time consuming part but had to be done. with a circular saw he made about 20 small cuts where the notch would be. we used a chisel to remove the wood that had been cut then sanded the bottom of the notch smooth using a sanding bit on our dremel.
when the notches on the legs were finished we pieced them together to make sure everything was level.
so the legs and bottom of the frame were nearly finished - we just had to make one more notch on each center stretcher -
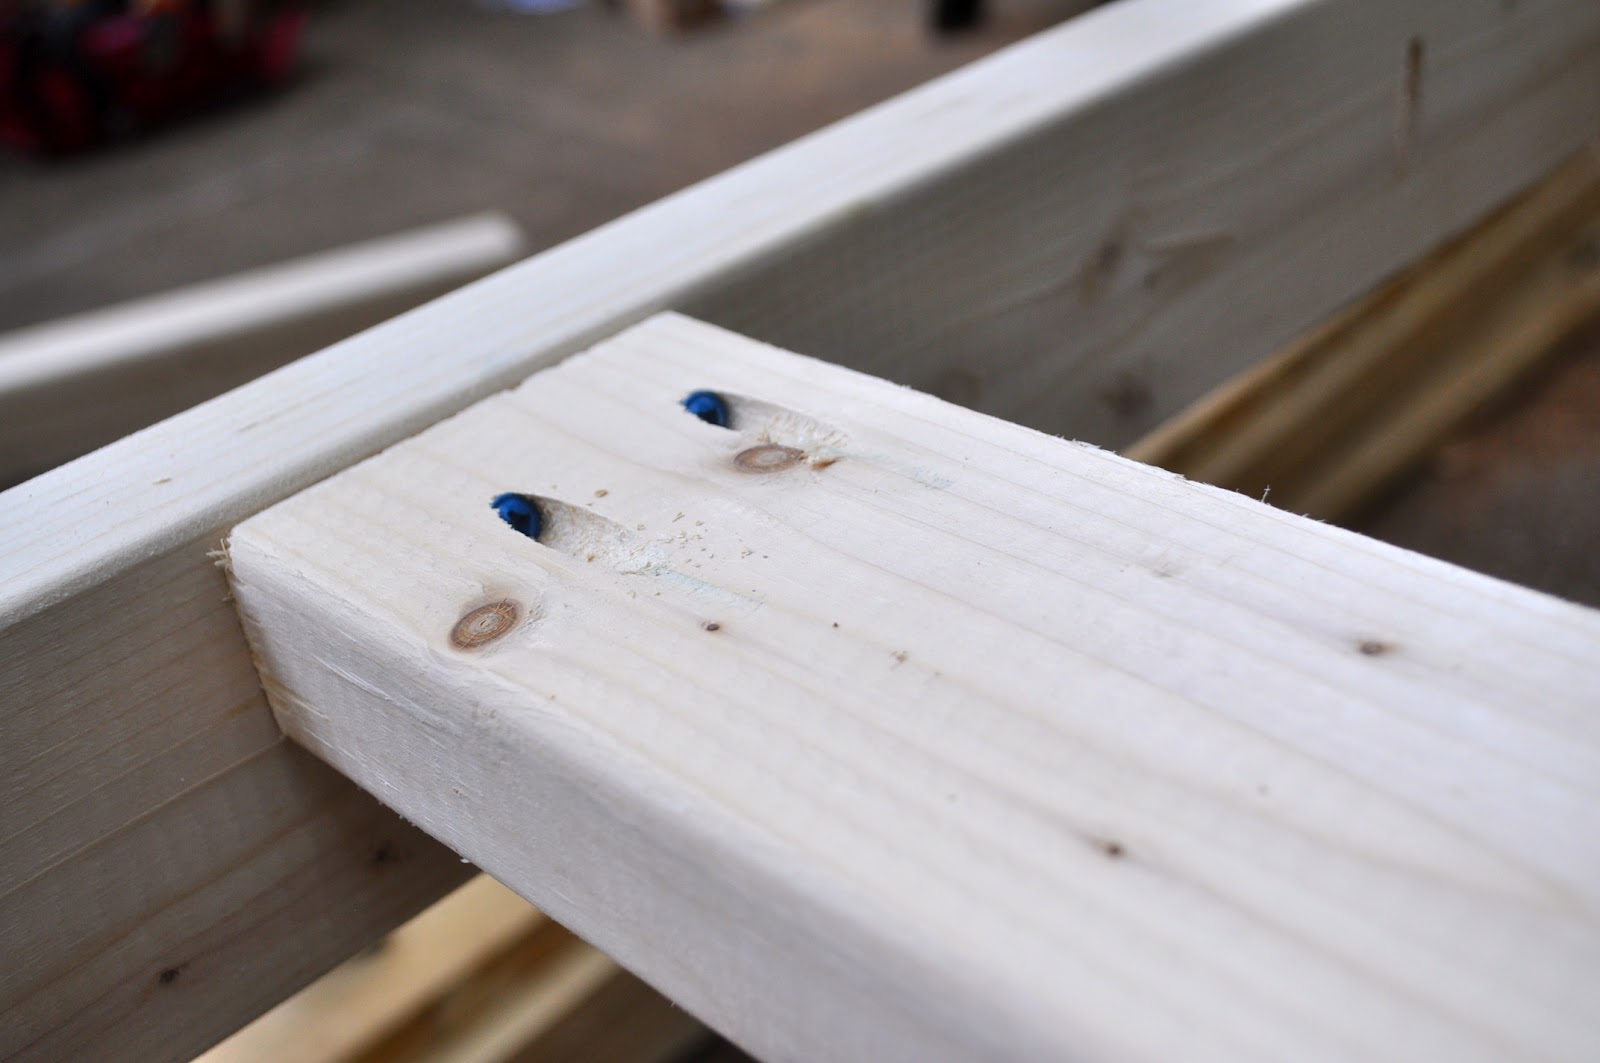
finally all the notches were finished. next we cut the 2x4's to frame the top of the table base. when everything was cut it was time to make the pocket holes. the point of pocket holes is so all the screws would be hidden. we purchased a kreg jig mini kit and it was by far the best investment we used for this project. again, making all the holes was a long task, but well worth the time.
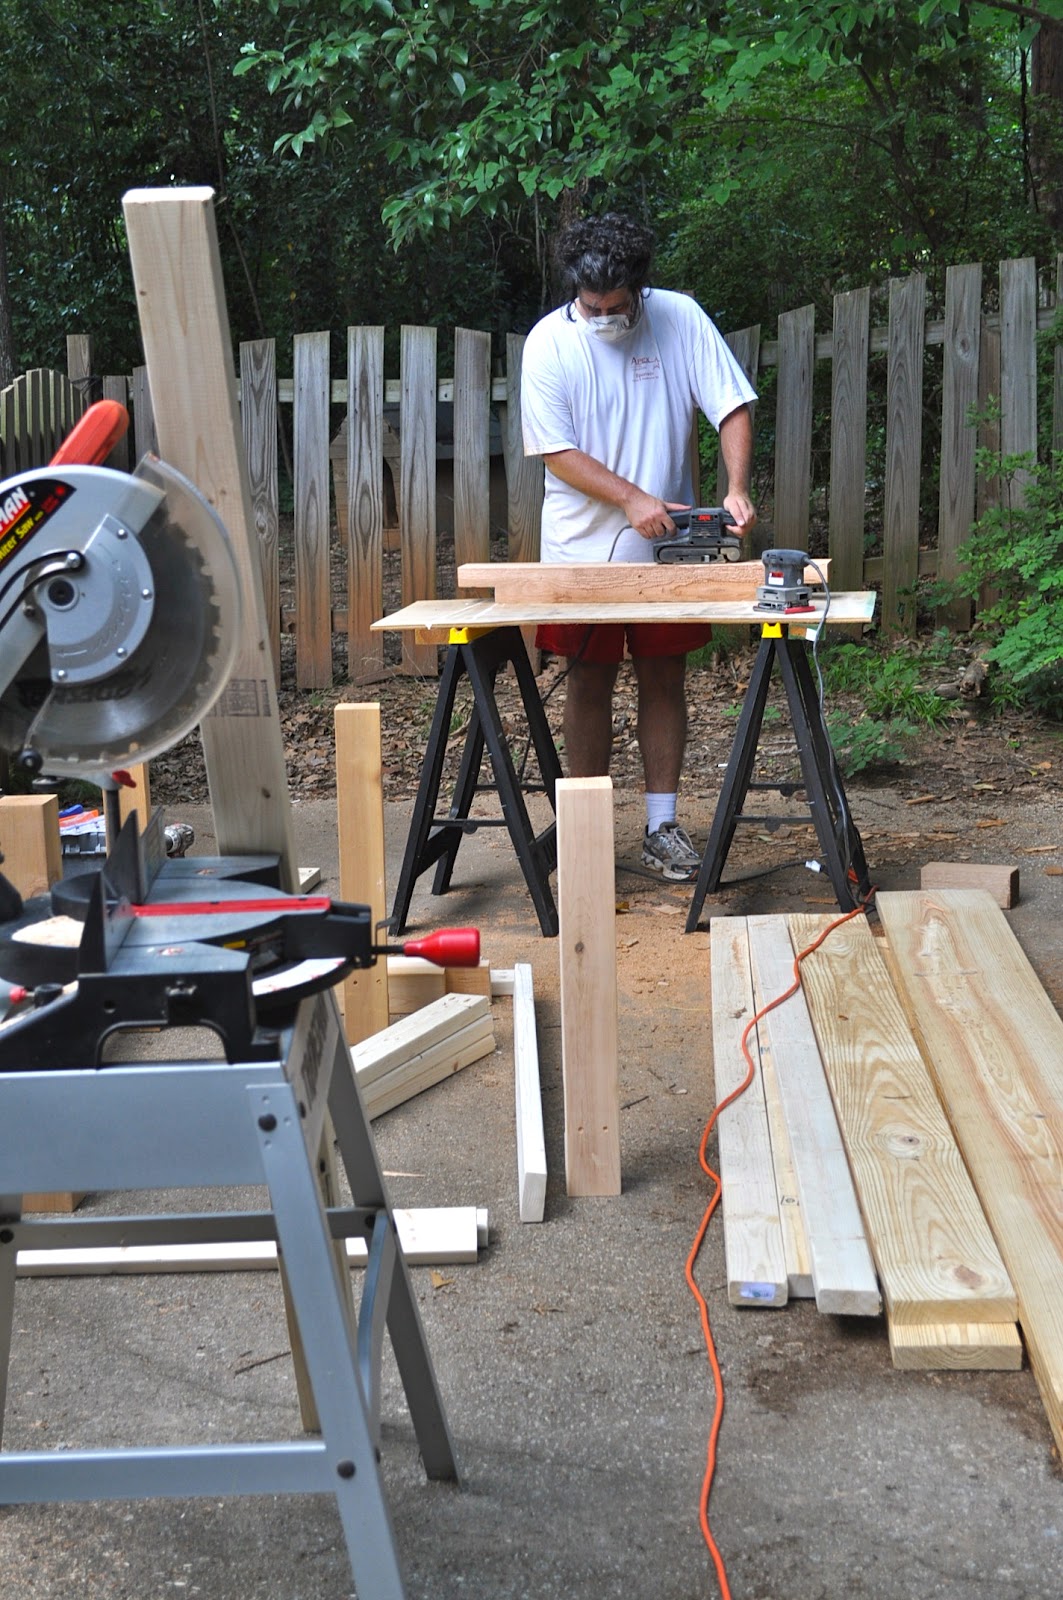
once all the holes were drilled we had to sand everything. thankfully we own a belt sander and a palm sander so we each got to work on the boards and cut the sanding time in half.
doesn't he just look adorable in his mask :-)
once all the boards were nice and smooth we screwed everything in place. we built the entire table base in one day and it fit perfectly together!!!!
and the finished table base - all put together and sturdy as can be! we are so proud!!!!
stay tuned for part two! we still have a TON of work to do - like putting together the table top, more sanding then staining and finishing the table. and also we are building the farmhouse bench to match.
until next time...
for mannnnny months i have been dying to get started on a farm table. we have bookmarked a billion blog postings showing the different steps of how people made their own, and finally it was time to make our own.
we went off these two plans to create our own version. all measurements had to be adjusted to create a six foot table.
tommy and ellie's farmhouse table
ana white farmhouse table
we did not want to use two 2x4's put together for the table legs so we chose to go with 4x4's like tommy and ellie. plus we wanted to make our table as close as possible to the original restoration hardware farmhouse table.
finding untreated 4x4's was quite the nightmare. we finally ended up choosing cedar which was muuuuuch more expensive than the regular untreated lumber, but this was going to be a long lasting piece of quality furniture, so well worth the extra money. after borrowing a friends truck and hauling all the lumber home, we started the building process!
first step - the notches.
this. took. FOREVER.
david cut the four legs and the side stretcher that connected them. there would be a total of ten notches. it was the most time consuming part but had to be done. with a circular saw he made about 20 small cuts where the notch would be. we used a chisel to remove the wood that had been cut then sanded the bottom of the notch smooth using a sanding bit on our dremel.
when the notches on the legs were finished we pieced them together to make sure everything was level.
so the legs and bottom of the frame were nearly finished - we just had to make one more notch on each center stretcher -
finally all the notches were finished. next we cut the 2x4's to frame the top of the table base. when everything was cut it was time to make the pocket holes. the point of pocket holes is so all the screws would be hidden. we purchased a kreg jig mini kit and it was by far the best investment we used for this project. again, making all the holes was a long task, but well worth the time.
once all the holes were drilled we had to sand everything. thankfully we own a belt sander and a palm sander so we each got to work on the boards and cut the sanding time in half.
doesn't he just look adorable in his mask :-)
once all the boards were nice and smooth we screwed everything in place. we built the entire table base in one day and it fit perfectly together!!!!
and the finished table base - all put together and sturdy as can be! we are so proud!!!!
stay tuned for part two! we still have a TON of work to do - like putting together the table top, more sanding then staining and finishing the table. and also we are building the farmhouse bench to match.
until next time...
Monday, May 21, 2012
Jamaica, mon!!!
my three years of marriage have been so unbelievably amazing. our anniversary celebration took place in ocho rios, jamaica and it was waaaaaaay beyond our expectations! we booked this trip in march and had been on the countdown ever since. finally our time arrived so we drove to atlanta and spent a night, then flew to the beautiful island of jamaica. when we arrived to the airport in montego bay (a shack) we were escorted to a bus that would take us to our resort. we knew that we had an hour and a half ride ahead of us to ocho rios so we made friends with the luggage guy. he showed us to the 'best' seat on the bus which was conveniently next to his and were on our way...
the drive was long even though it felt like we were traveling 100 mph on the wrong side of the road! the way people lived along the way was nothing even remotely imaginable. im talking houses made from sticks - plastic tarps for a roof - dirt floors. it was very heart wrenching knowing that we were headed for a billion dollar resort when the people of that same village lived this way.
i was forewarned by many that jamaican sellers live off tourist dollars. when traveling to a resort in any country this is inevitable. jamaica is also widely known for drug dealing... and within one hour of being in their country, we were offered drugs. yes - on a bus full of tourists. we politely declined and that was that.
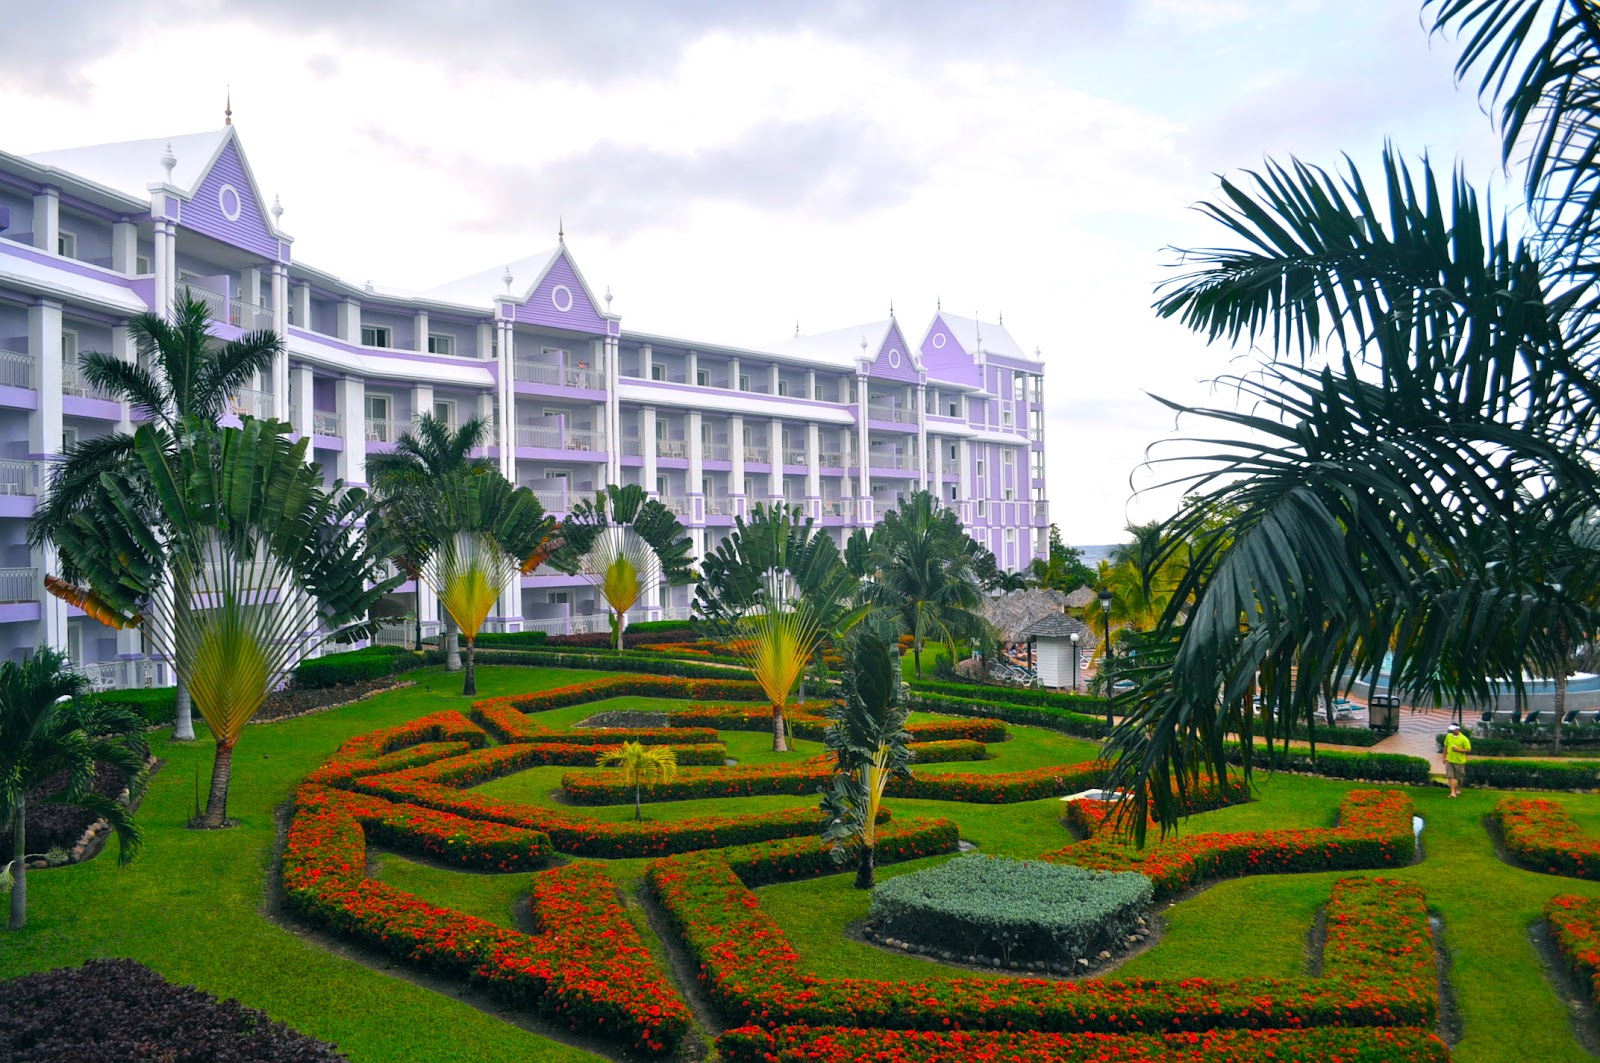
finally we arrived at our resort, the riu ocho rios.
it. was. magnificent.
we walked into an open air lobby that was ginormous and beautiful.
we were given our bags and went to check in. while standing at the desk we were handed welcome drinks that they called baby makers! regardless the given name it was delish!
then we were informed that we had been upgraded to the delux wing!!!!!!!!!! it was already turning into a fantastic trip. so we found our room, admiring the breathtaking views as we walked, and started to realize we were truly in paradise. our room contained a fridge stocked with water, diet soda, and jamaican red stripe beer, liquor dispensers filled with anything you could possibly need, a california king bed, and a balcony that overlooked the ginormous pool and the heavenly crystal blue caribbean sea. yes, we had most definitely found our paradise.
we changed into our bathingsuits and coverups, ate lunch then headed straight for the beach. being on the deluxe wing most definitely had its advantages - it was a LOT less crowded and we had no problem finding a perfect spot. here are a few images of the breathtaking beach -
time flew by and that continued every single day. the heat was indescribable and davids feet got scorched the first day. if you had no access to the beach or a pool i really have no clue how you could deal with type of weather... but we did have access... and we soaked it alllllll up! thankfully my spf 70 did its job keeping me from burning as bad as i normally would. the ocean was surrounded by natural reef that anyone could snorkel over and also had TON of swimming room. it amazed me because i absolutely do NOT swim in the ocean - atlantic or pacific. if i can't see my feet, im not going in! in mexico, the ocean was literally ALL reef so swimming wasnt much of an option, but here we pretty much stayed in the ocean all day long.
jamaicans sat on jet skis in the water trying to sell to all the tourists. they gave rides to people and one man even came out of the water with armloads of jewelry. we literally fell over laughing! they definitely work hard for their money! one man would go snorkeling every morning faaaaaar out over the reef and collected conk shells bigger than ive ever seen. he would swim his way up to shore and sell them... it amazed me!
and everyday for us was the same - get up around 730 and have breakfast - go to the beach - lay out and read for about 20 minutes - get in the ocean and swim - walk up to the pool and hit the swim up bar - lay out some more and dry off (which took a whole two minutes) - have lunch at the jerk hut which is amazing - then do it all over again until the sun was gone. we would clean up and go have dinner then enjoy the resorts nightly entertainment. my favorite was reggae night.
another view of the amazing beach and the most beautiful view while having our morning coffee -
here are some photos of the amazing swimming pool featuring beds, tables by the swim up bars and an infinity pool.
on thursday night street vendors were let inside the resort to sell their goods. david got a bamboo cup hand carved with his name and i got a beautiful handmade turquoise bracelet. both items we will cherish forever!
friday morning david took a sailing lesson for 20 bucks which lasted about 20 minutes, then we got to sail on our own. it was the most amazing part of the trip for my man! he insisted on being called captain the rest of the trip, and even named his boat the black pearl. being that far out, just us on a sailboat in the middle of the sea, was scary but super awesome. And of course he did it like a pro!
that afternoon, after hours of convincing him he would enjoy it, we kayaked. that was my highlight! i used to love kayaking and doing this on the caribbean sea pretty much made my life :-)
saturday we had an excursion planned to go to dunns river falls. it's a 600 foot waterfall that you climb, and it was way more strenuous than i had planned, but was so great. you got to fall backwards into deeper areas - slide down rocks like a water slide - and best, literally stand under the falls. it took about two hours and was worth every second.
we enjoyed more of the beautiful caribbean sea and snorkeled when we got back to the resort.... we had to enjoy every bit of sunshine that was left. thankfully our water camera had a few more snaps left so we got these priceless photos -
that evening we cleaned up (quickly) and headed back to the beach to take some more photos. we were already getting super depressed that it was our last night - it had seriously flown by.
sunday was our last day and we had to catch our bus at 10:30. we woke at 6:30, grabbed a carafe of coffee and a few pastries smeared with hot nutella and headed to the beach. we soaked in every second of sunshine we could and the views this early in the morning were breathtaking.
we swam our last swim in the ocean. it was a sad day and we were not ready to leave but it had to end at some point and we were seriously missing our pups. we checked out, got on the bus and were gone. it went so fast but we felt so incredibly grateful to have the time we did.
we also vowed that would not be the last time jamaica saw our faces! that's a fact.
the drive was long even though it felt like we were traveling 100 mph on the wrong side of the road! the way people lived along the way was nothing even remotely imaginable. im talking houses made from sticks - plastic tarps for a roof - dirt floors. it was very heart wrenching knowing that we were headed for a billion dollar resort when the people of that same village lived this way.
i was forewarned by many that jamaican sellers live off tourist dollars. when traveling to a resort in any country this is inevitable. jamaica is also widely known for drug dealing... and within one hour of being in their country, we were offered drugs. yes - on a bus full of tourists. we politely declined and that was that.
finally we arrived at our resort, the riu ocho rios.
it. was. magnificent.
we walked into an open air lobby that was ginormous and beautiful.
we were given our bags and went to check in. while standing at the desk we were handed welcome drinks that they called baby makers! regardless the given name it was delish!
then we were informed that we had been upgraded to the delux wing!!!!!!!!!! it was already turning into a fantastic trip. so we found our room, admiring the breathtaking views as we walked, and started to realize we were truly in paradise. our room contained a fridge stocked with water, diet soda, and jamaican red stripe beer, liquor dispensers filled with anything you could possibly need, a california king bed, and a balcony that overlooked the ginormous pool and the heavenly crystal blue caribbean sea. yes, we had most definitely found our paradise.
we changed into our bathingsuits and coverups, ate lunch then headed straight for the beach. being on the deluxe wing most definitely had its advantages - it was a LOT less crowded and we had no problem finding a perfect spot. here are a few images of the breathtaking beach -
time flew by and that continued every single day. the heat was indescribable and davids feet got scorched the first day. if you had no access to the beach or a pool i really have no clue how you could deal with type of weather... but we did have access... and we soaked it alllllll up! thankfully my spf 70 did its job keeping me from burning as bad as i normally would. the ocean was surrounded by natural reef that anyone could snorkel over and also had TON of swimming room. it amazed me because i absolutely do NOT swim in the ocean - atlantic or pacific. if i can't see my feet, im not going in! in mexico, the ocean was literally ALL reef so swimming wasnt much of an option, but here we pretty much stayed in the ocean all day long.
jamaicans sat on jet skis in the water trying to sell to all the tourists. they gave rides to people and one man even came out of the water with armloads of jewelry. we literally fell over laughing! they definitely work hard for their money! one man would go snorkeling every morning faaaaaar out over the reef and collected conk shells bigger than ive ever seen. he would swim his way up to shore and sell them... it amazed me!
and everyday for us was the same - get up around 730 and have breakfast - go to the beach - lay out and read for about 20 minutes - get in the ocean and swim - walk up to the pool and hit the swim up bar - lay out some more and dry off (which took a whole two minutes) - have lunch at the jerk hut which is amazing - then do it all over again until the sun was gone. we would clean up and go have dinner then enjoy the resorts nightly entertainment. my favorite was reggae night.
another view of the amazing beach and the most beautiful view while having our morning coffee -
here are some photos of the amazing swimming pool featuring beds, tables by the swim up bars and an infinity pool.
on thursday night street vendors were let inside the resort to sell their goods. david got a bamboo cup hand carved with his name and i got a beautiful handmade turquoise bracelet. both items we will cherish forever!
friday morning david took a sailing lesson for 20 bucks which lasted about 20 minutes, then we got to sail on our own. it was the most amazing part of the trip for my man! he insisted on being called captain the rest of the trip, and even named his boat the black pearl. being that far out, just us on a sailboat in the middle of the sea, was scary but super awesome. And of course he did it like a pro!
that afternoon, after hours of convincing him he would enjoy it, we kayaked. that was my highlight! i used to love kayaking and doing this on the caribbean sea pretty much made my life :-)
saturday we had an excursion planned to go to dunns river falls. it's a 600 foot waterfall that you climb, and it was way more strenuous than i had planned, but was so great. you got to fall backwards into deeper areas - slide down rocks like a water slide - and best, literally stand under the falls. it took about two hours and was worth every second.
we enjoyed more of the beautiful caribbean sea and snorkeled when we got back to the resort.... we had to enjoy every bit of sunshine that was left. thankfully our water camera had a few more snaps left so we got these priceless photos -
that evening we cleaned up (quickly) and headed back to the beach to take some more photos. we were already getting super depressed that it was our last night - it had seriously flown by.
sunday was our last day and we had to catch our bus at 10:30. we woke at 6:30, grabbed a carafe of coffee and a few pastries smeared with hot nutella and headed to the beach. we soaked in every second of sunshine we could and the views this early in the morning were breathtaking.
we swam our last swim in the ocean. it was a sad day and we were not ready to leave but it had to end at some point and we were seriously missing our pups. we checked out, got on the bus and were gone. it went so fast but we felt so incredibly grateful to have the time we did.
we also vowed that would not be the last time jamaica saw our faces! that's a fact.
Subscribe to:
Posts (Atom)